PWA Support

Find out how to turn your DoIt site into a Progressive Web App.
1 What are PWAs?
Progressive Web Apps are web apps that use emerging web browser APIs and features along with traditional progressive enhancement strategy to bring a native app-like user experience to cross-platform web applications.
2 Why bother?
Well, the straight answer to this questions is: “You don’t need to turn your site into a PWA.” A normal website is good enough for all the content you want to share. However, a PWA brings some extra benefits that might be useful.
- Pages will be automatically cached by service workers when the app is installed, which enables a near-instantaneous loading from the second visit.
- Users can always visit cached pages when they are offline.
These features may be useful for some websites, such as this documentation site. But it does not make much sense to turn a personal blog into a PWA. In the end, it all depends on your choice, and the DoIt theme will provide this feature for you anyway.
3 How to turn your DoIt site into a PWA?
3.1 Configure site.webmanifest
Under the /static folder, you need to create a file named site.webmanifest. This file provides information about your app and it is required for your app to be installable.
Here are the key values required.
-
name [required]
The name of your web app.
-
short_name [required]
A shorter name for your web app.
-
start_url [required]
The start URL of your web app. Please fill in
"/"by default. -
icons [required]
An array of objects representing image files will be served as application icons. You can reuse the favicon of your site as the icons.
There are other optional values you can set in the manifest file, check out this documentation for more information.
Here is a sample site.webmanifest file from this documentation site.
{
    "name": "DoIt Theme Documentation",
    "short_name": "DoIt Docs",
    "start_url": "/",
    "description": "The documentation site for Hugo DoIt Theme",
    "theme_color": "#ffffff",
    "background_color": "#ffffff",
    "orientation": "portrait",
    "display": "standalone",
    "icons": [
        {
            "src": "/android-chrome-192x192.png",
            "sizes": "192x192",
            "type": "image/png"
        },
        {
            "src": "/android-chrome-512x512.png",
            "sizes": "512x512",
            "type": "image/png"
        },
        {
            "src": "/apple-touch-icon.png",
            "sizes": "180x180",
            "type": "image/png",
            "purpose": "any maskable"
        }
    ]
}
3.2 Configure the offline page
The offline page will be served to your visitor when they are offline.
Create offline.md under /content directory and write an offline message.
/offline, otherwise, you will need to modify the value of OFFLINE_CACHE_FILES and OFFLINE_PAGE in the service worker yourself.Here is a sample offline page.
---
title: "Offline"
---

> You are not connected to the Internet, only cached pages will be available.
3.3 Enable the enablePWA option
Go to config.toml, add or change the option enablePWA = true under [params].
[params]
    # ...
    enablePWA = true
4 Install your PWA
Now, an install button should show up when you visit your website and you will be able to install your site as an app.
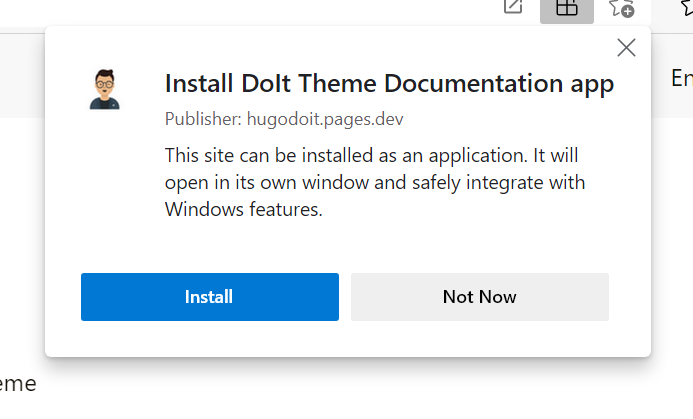
After clicking “Install”, your website should be installed as a native app.

Congratulation! You have successfully turned your static site into a PWA🎉
If you have any issues during the setup process, you can check the Console and Application panels in your browser’s DevTools for debugging. Alternatively, you can check your site on PWA Builder for more information. You can also start a discussion if you have any questions or propose an issue for any bugs you find.